This past weekend I installed a SSL Certificate onto a DigitalOcean Droplet (Ubuntu/Apache). The droplet runs a little side-project of mine - a fan site for the Swarm app where I test and try ideas, frameworks and technologies. During installation I encountered a few hiccups so hopefully this can save some others some time.
Generate a CSR and Private Key
The first step is to create a CSR (Certificate Signing Request) and private key on your server. DigitalOcean provides a great how-to on this process. In short, you'll run an openssl command, answer a few questions and then a .csr and .key file will be created.
Purchase a SSL Certificate
If you're new to the SSL world you're in for a wild ride. When you begin your search for an SSL Certificate you'll most likely be overwhelmed by the options. It's a competitive industry and features/pricing range widely.
One important thing to know - there are about 20 providers (or issuers) of SSL Certificates and hundreds of re-sellers. That is, there are about 20 providers who can issue SSL Certificates, but you can purchase SSL Certificates through hundreds of retailers.
The next thing to know is that not all SSL Certificates are the same. There are essentially 3 levels of SSL Certs:
- Extended Validation (EV) - the SSL Cert issuer checks the right of the applicant to use a specific domain name PLUS it conducts a THOROUGH vetting of the organization. This is the most stringent and most often seen on e-commerce and other sites collecting sensitive data.
- Organization Validation (OV) - the SSL Cert issuer checks the right of the applicant to use a specific domain name PLUS it conducts some vetting of the organization
- Domain Validation (DV) - the SSL Cert issuer checks the right of the applicant to use a specific domain name. This is the simplest option and great for small sites.
Another differentiator is how many domains can be secured with the SSL Certificate:
- Single-Name - secures a single domain or sub-domain, but not sub-domains. Ex, a certificate for
www.mydomain.comwill not securesub.mydomain.com. This is usually the least expensive option. - Wildcard - secures a single domain and unlimited number of sub-domains.
- Multi-Domain - secures multiple domains with a single certificate.
And finally, there is some variation in browser compatibility. The major SSL issuers support around 99% but it is worth checking before purchasing, especially if you're looking for an inexpensive SSL Cert. Make sure the certificate is supported by the majority of browsers, or the ones you need to support.
In my case, I purchased a Single-Name, Domain Validated SSL Certificate from Comodo, through the Namecheap reseller.
Request the Certificate
Once you've purchased the certificate you'll need to request your certificate. The process varies depending on the issuer. For me, I had to upload the key I created on my Droplet, then verify my domain (by creating a CNAME Record). Once the domain was verified I received a zip file containing my certificate.
The zip file contained 4 files:
AddTrustExternalCARoot.crtCOMODORSAAddTrustCA.crtCOMODORSADomainValidationSecureServerCA.crtSTAR_mydomin_com.crt
Install the Certificate
From here I (mostly) followed DigitalOcean's steps configuring Apache/Ubuntu. I say 'mostly' because I did encounter an issue when testing the SSL using the [SSL Labs Testing tool] - I had 2 Certification Paths (or Chains) and both were 'broken' because they required extra downloads. This worked fine on my desktop but Chrome on Android displayed a security warning. For a public site this would not work as many people would refuse to accept the warning and would leave the site.
Here's how I installed the SSL Certificate and got it working.
First, upload the 4 files you received from Comodo to /etc/ssl, or whatever path your prefer. Then cd into the directory you've uploaded the files.
This next step was what fixed the issues on Android. You need to concatenate 2 of the .crt files provided from Comodo:
cat STAR_mydomain_com.crt intermediate.crt AddTrustExternalCARoot.crt > ssl-bundle.crt
This will create a ssl-bundle.crt file.
Make a backup of your configuration file by copying it. Assuming your server is running on the default virtual host configuration file, /etc/apache2/sites-available/000-default.conf, use these commands to to make a copy:
cd ~
cd /etc/apache2/sites-available
cp 000-default.conf 000-default.conf.orig
Then open the file for editing:
sudo vi 000-default.conf
Find the <VirtualHost *:80> entry and modify it so your web server will listen on port 443:
<VirtualHost *:443>
Then add the ServerName directive, if it doesn't already exist (substitute your domain name here):
ServerName mydomain.com
Then add the following lines to specify your certificate and key paths (substitute your actual paths here):
SSLEngine on
SSLCertificateKeyFile /etc/ssl/mydomain.com.key
SSLCertificateFile /etc/ssl/STAR_mydomain_com.crt
The 2nd line, SSLCertificateKeyFile is the file you generated on your server. The 3rd line, SSLCertificateFile is the file provided by Comodo.
If you are using Apache 2.4.8 or greater, specify the CA intermediate bundle (the file we created) by adding this line (substitute the path):
SSLCACertificateFile /home/ssl/ssl-bundle.crt
If you are using an older version of Apache, specify the CA intermediate bundle with this line (substitute the path):
SSLCertificateChainFile /etc/ssl/ssl-bundle.crt
At this point, your server is configured to listen on HTTPS only (port 443), so requests to HTTP (port 80) will not be served. To redirect HTTP requests to HTTPS, add the following to the top of the file (substitute the name in both places):
<VirtualHost *:80>
  ServerName example.com
  Redirect permanent / https://mydomain.com/
</VirtualHost>
Save and exit.
Enable the Apache SSL module by running this command:
sudo a2enmod ssl
Now restart Apache to load the new configuration and enable TLS/SSL over HTTPS!
sudo service apache2 restart
Once Apache restarted I was able to pull up my site and was redirected to the HTTPS version.
Test the SSL Certificate
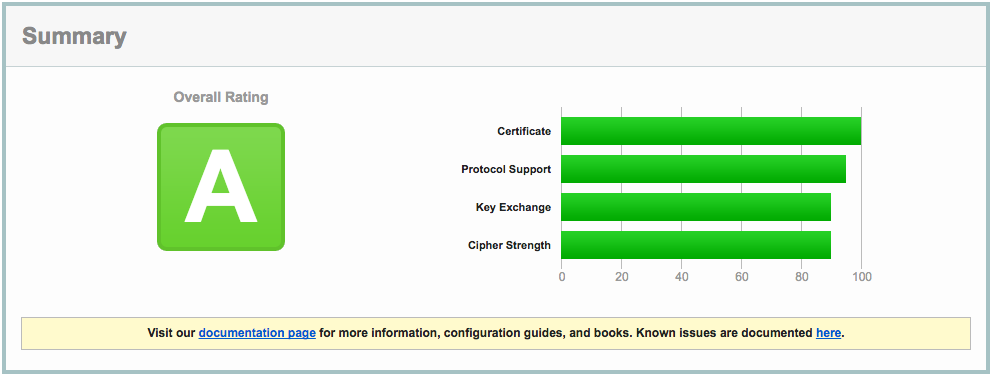
The SSL Labs Tool is a great way to ensure everything is working as it should.
My initial test showed a grade of B due to some vulnerabilities in the types of SSL my server was supporting. To fix this I added the following lines to 000-default.conf
 SSLProtocol all -SSLv2 -SSLv3

 SSLCipherSuite "EECDH+ECDSA+AESGCM EECDH+aRSA+AESGCM EECDH+ECDSA+SHA384 EECDH+ECDSA+SHA256 EECDH+aRSA+SHA384 EECDH+aRSA+SHA256 EECDH EDH+aRSA !aNULL !eNULL !LOW !3DES !MD5 !EXP !PSK !SRP !DSS !RC4"
With these settings in place the SSL Labs tool graded my server an A.
Next Steps
I'm hoping to see a bit of a bump in search engine result placement with this change. I have Google Analytics and Google Search Console setup so I'll be keeping a close eye on them over the next few weeks.
Comments